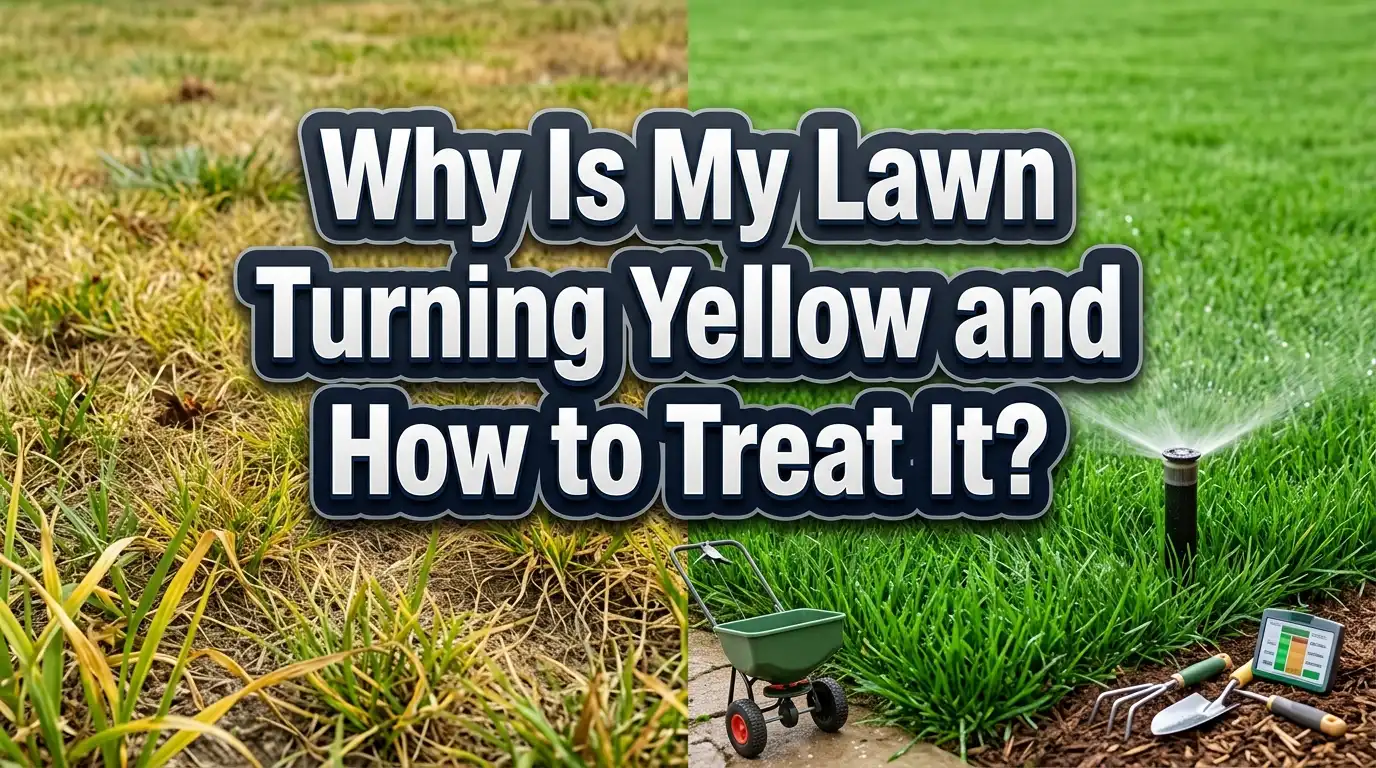
Why Is My Lawn Turning Yellow and How to Treat It?
A yellow lawn is one of the most common problems homeowners face, and the causes range from simple watering mistakes to hidden soil issues lurking beneath the surface.
The good news? Most causes of yellow grass are fixable with the right diagnosis and a few practical steps.
The frustrating part is that many different problems produce the same visible symptom, which makes it easy to waste time and money treating the wrong issue.
This guide walks you through every major reason your lawn turns yellow and gives you clear, step by step solutions for each one. Read on to stop guessing and start restoring your yard.
Key Takeaways
- Yellow grass does not always mean dead grass. In many cases, yellowing is a sign of stress or dormancy, and your lawn can bounce back with the right care. Identifying the root cause is the most important first step before applying any treatment.
- Watering problems are the number one culprit. Both overwatering and underwatering cause yellow grass. Check your soil moisture at a depth of two to three inches before adjusting your irrigation schedule.
- Nutrient deficiencies, especially nitrogen and iron, produce widespread yellowing. A simple soil test from your local extension office will reveal exactly what your lawn needs.
- Fungal diseases thrive in warm, humid conditions and often appear as circular yellow or brown patches. Proper mowing height, morning watering, and good air circulation are your best defenses.
- Dog urine, soil compaction, and incorrect mowing height are frequently overlooked causes. Each has a specific, targeted fix that can restore green color in just a few weeks.
- Always diagnose before you treat. Throwing fertilizer at a fungal problem or watering more when you are already overwatering will only make the situation worse. Take the time to identify the exact issue first.
What Makes Grass Turn Yellow in the First Place?
Grass turns yellow when its cells lose chlorophyll, the pigment responsible for the green color. Chlorophyll production depends on a steady supply of water, sunlight, and key nutrients like nitrogen, iron, and magnesium. When any of these inputs fall out of balance, the grass blades lose their green pigment and shift to yellow.
The technical term for this process is chlorosis. It can affect the entire lawn or show up in scattered patches, depending on the cause. A uniform yellowing across the whole yard usually points to a nutrient problem or watering issue. Patchy yellowing, on the other hand, often signals disease, pet damage, or localized soil compaction.
Temperature also plays a role. Cool season grasses like Kentucky bluegrass and fescue may turn yellow during hot summer months as a natural stress response. Warm season grasses like Bermuda and St. Augustine go dormant and yellow in cooler weather. Understanding your grass type helps you determine whether the yellowing is a normal seasonal shift or a real problem that needs attention.
Your lawn’s root system matters too. Shallow roots cannot reach moisture or nutrients deep in the soil, so the grass starves at the surface. Compacted soil, excessive thatch, and poor drainage all contribute to weak root development. Healthy roots are the foundation of a green lawn, so any fix needs to address what is happening below ground, not just what you see on the surface.
Overwatering: The Hidden Cause of Yellow Lawns
Many homeowners assume more water equals greener grass. This is one of the biggest lawn care myths. Overwatering actually suffocates grass roots by filling the air pockets in the soil with water, which starves the roots of oxygen. The result is yellow, wilting grass that looks sick despite getting plenty of moisture.
Signs of overwatering include spongy or soggy turf, puddles that linger after irrigation, and a noticeable increase in fungal growth or mushrooms. You may also notice more weeds creeping in, since many weed species love wet conditions. If the soil feels muddy two or three inches below the surface several hours after watering, you are giving your lawn too much.
The fix is straightforward. Water deeply but less often. Most lawns need about one inch of water per week, delivered in two or three sessions rather than daily sprinkling. Water in the early morning so the grass blades dry before evening, which reduces fungal risk.
Pros of reducing watering frequency: Lower water bills, stronger root growth, reduced disease risk, and fewer weeds.
Cons of reducing watering frequency: Requires patience during the adjustment period, and the lawn may look slightly stressed for the first week or two before roots grow deeper.
Use a screwdriver test to check soil moisture. Push a screwdriver into the ground. If it slides in easily, the soil is moist enough. If it meets strong resistance, the soil is too dry. This simple test takes ten seconds and prevents costly mistakes.
Underwatering and Drought Stress
On the opposite end, not giving your lawn enough water causes the grass to conserve energy by shutting down chlorophyll production. The blades turn from green to yellow and eventually to brown if the drought continues. You will often see footprints lingering in the grass because the dehydrated blades lack the moisture to spring back.
Drought stress typically appears first in areas with thin soil, slopes, or spots far from sprinkler heads. These high spots and edges dry out faster than the rest of the yard. If you notice yellowing in specific zones while the rest stays green, check your irrigation coverage.
To fix underwatering, increase your watering sessions and focus on deep soaking. Apply water slowly so it penetrates the soil rather than running off. Aim for six to eight inches of soil moisture depth to encourage roots to grow downward. Early morning watering between 6 AM and 10 AM is ideal.
Pros of deep, infrequent watering: Promotes deep root growth, builds drought resistance over time, and creates a healthier lawn overall.
Cons of deep, infrequent watering: Takes longer per session, may require adjusting sprinkler run times, and can temporarily increase water use during the recovery phase.
If your region has watering restrictions, consider applying a thin layer of compost as a top dressing. Compost improves the soil’s ability to retain moisture, which means your lawn gets more benefit from less water.
Nitrogen Deficiency: The Most Common Nutrient Problem
Nitrogen is the nutrient grass needs most, and a shortage shows up as a gradual, uniform yellowing that starts with the older, lower leaves. The lawn looks pale and thin. Growth slows down, and the grass loses its ability to fight off weeds and disease.
You can confirm a nitrogen deficiency with a soil test kit or by sending a sample to your local cooperative extension office. A soil test costs very little and saves you from guessing. It tells you exactly which nutrients are low and how much to apply.
The solution is to apply a nitrogen rich fertilizer according to the soil test results. Slow release formulas work best because they feed the lawn steadily over several weeks. Apply fertilizer when the grass is actively growing, which means spring and fall for cool season grasses and late spring through summer for warm season varieties.
Pros of slow release nitrogen fertilizer: Even feeding, lower burn risk, longer lasting results, and fewer applications needed per season.
Cons of slow release nitrogen fertilizer: Slower visible results compared to quick release products, and slightly higher cost per bag.
Be careful not to over apply. Too much nitrogen causes rapid, weak growth that invites disease and burns the grass. Follow the recommended rate on the soil test report, and never exceed the label instructions on any fertilizer product.
Iron Deficiency and Chlorosis
Iron chlorosis is another frequent cause of yellow lawns, and it looks different from nitrogen deficiency. Iron deficiency shows up in new growth first, with the grass blades developing yellow color between the veins while the veins themselves stay green. This gives the blades a striped appearance.
High soil pH is the usual culprit. When soil pH rises above 7.0, iron becomes chemically locked in the soil and the grass roots cannot absorb it even when plenty of iron is present. This is why adding more iron does not always fix the problem. You may also need to lower the soil pH.
Apply a liquid iron supplement for a quick visual green up. This works within days and gives you time to address the underlying pH issue. For a long term fix, test your soil pH and apply sulfur or an acidifying fertilizer to bring it down to the 6.0 to 7.0 range where most grasses thrive.
Pros of liquid iron application: Fast results, deepens green color quickly, and is relatively inexpensive.
Cons of liquid iron application: Temporary fix that does not address root cause, can stain concrete and driveways, and needs repeated applications.
Pros of pH correction with sulfur: Addresses the root cause, improves overall nutrient availability, and creates lasting improvement.
Cons of pH correction with sulfur: Takes several months to change pH, requires accurate soil testing, and over application can make soil too acidic.
Lawn Diseases That Cause Yellowing
Several fungal diseases produce yellow patches in lawns. Dollar spot, yellow patch, and rust are the most common. Dollar spot creates small, silver dollar sized spots that merge into larger yellow areas. Yellow patch disease forms rings or patches on cool season grasses during cool, wet weather. Rust appears as orange or yellow powder on grass blades.
Fungal diseases thrive in conditions of high humidity, poor air circulation, and excessive moisture on the leaves. Watering in the evening is one of the biggest risk factors because wet grass overnight creates the perfect environment for fungal spores.
Prevention is the best treatment. Mow at the correct height for your grass type, water in the morning, and avoid over fertilizing with nitrogen, which produces lush growth that fungi love. Improve air circulation by trimming overhanging branches and shrubs near the lawn.
If disease has already taken hold, apply a fungicide labeled for your specific disease. Identify the disease first because different fungi respond to different active ingredients. Your local extension office or a lawn care professional can help with identification.
Pros of cultural prevention (mowing, watering, airflow): Free, addresses root cause, and prevents recurrence.
Cons of cultural prevention: Takes time to see results and requires consistent maintenance habits.
Pros of fungicide treatment: Fast disease control and stops spread quickly.
Cons of fungicide treatment: Costs money, requires accurate diagnosis, may need repeat applications, and does not address the underlying conditions that caused the disease.
Dog Urine and Pet Damage
Dog urine is high in nitrogen salts, which burn the grass in concentrated spots. The result is a small circle of yellow or brown dead grass, often surrounded by a ring of darker green where the diluted nitrogen actually fertilized the lawn. If you have dogs, this pattern is an unmistakable clue.
The fastest fix is to water the spot immediately after your dog urinates. Diluting the urine with water prevents the salt concentration from reaching damaging levels. Keep a watering can or hose nearby during outdoor time.
For spots that have already turned yellow, rake out the dead grass, loosen the top inch of soil, apply a thin layer of compost, and reseed. Water the reseeded area lightly twice a day until the new grass establishes. You should see sprouts within one to two weeks.
Some homeowners apply gypsum to affected spots to help neutralize the salts in the soil. This can improve recovery in areas with repeated damage. Training your dog to use a designated area of the yard is the most effective long term solution.
Pros of immediate watering after urination: Simple, free, and prevents damage entirely.
Cons of immediate watering after urination: Requires you to be present every time your dog goes outside, which is not always practical.
Pros of reseeding damaged spots: Restores the lawn fully and is inexpensive.
Cons of reseeding damaged spots: Takes two to four weeks for full recovery, and new spots may appear if the behavior continues.
Soil Compaction and Poor Root Health
Compacted soil is a silent lawn killer. When soil particles are pressed tightly together, water, air, and nutrients cannot reach the grass roots. The lawn slowly starves and turns yellow even though you are watering and fertilizing regularly.
High traffic areas, clay soils, and lawns built on construction fill are most prone to compaction. Signs include water pooling on the surface, thin or patchy grass, and soil that is rock hard when you push a screwdriver into it. If the screwdriver cannot penetrate more than two inches, your soil is compacted.
Core aeration is the best fix for compacted soil. A core aerator pulls small plugs of soil out of the ground, creating channels for air, water, and nutrients to reach the root zone. Aerate once or twice a year during your grass’s active growing season.
After aeration, apply a thin layer of compost over the lawn and water it in. The compost fills the aeration holes and introduces beneficial microbes that improve soil structure over time. This combination of aeration and compost is the gold standard for fixing compacted soil.
Pros of core aeration: Immediately improves water and nutrient penetration, promotes deeper root growth, and can be done with a rental machine.
Cons of core aeration: Leaves soil plugs on the surface for a few days, requires equipment rental or professional service, and is physically demanding for large lawns.
Mowing Mistakes That Turn Grass Yellow
Cutting your grass too short, a practice called scalping, removes too much of the leaf blade at once. The grass loses its ability to photosynthesize and turns yellow or brown. This is especially common when homeowners lower the mowing deck to reduce mowing frequency.
The general rule is the one third rule: never remove more than one third of the grass blade height in a single mowing. If your target height is three inches, mow when the grass reaches four and a half inches. This keeps the lawn healthy and prevents shock.
Dull mower blades are another overlooked problem. A dull blade tears the grass instead of cutting it cleanly. The torn tips turn yellow or brown within a day or two, giving the whole lawn a washed out appearance. Sharpen your mower blades at least twice per mowing season or whenever you notice ragged cuts on the grass tips.
Mowing wet grass creates clumps that smother the turf beneath them, blocking sunlight and trapping moisture. Always mow when the grass is dry to get a clean cut and even distribution of clippings.
Pros of maintaining proper mowing height: Promotes dense growth, reduces weed invasion, and strengthens root systems.
Cons of maintaining proper mowing height: Requires more frequent mowing, which takes more time each week.
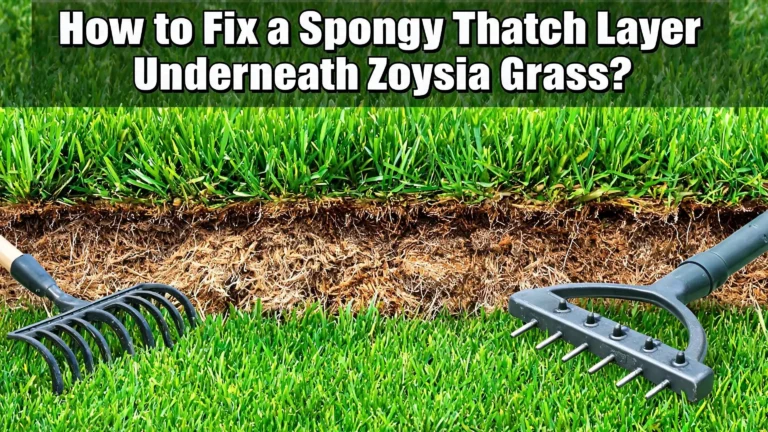
Thatch Buildup and Its Effect on Lawn Color
Thatch is a layer of dead grass stems, roots, and organic debris that accumulates between the soil surface and the green grass blades. A thin layer of thatch (half an inch or less) is actually beneficial because it insulates the soil and retains moisture. But when thatch exceeds three quarters of an inch, it becomes a barrier.
Thick thatch prevents water, fertilizer, and air from reaching the soil. Grass roots begin growing in the thatch layer instead of the soil, which makes them shallow and vulnerable. The lawn turns yellow because the roots cannot access what they need.
To check your thatch level, cut a small wedge of turf with a knife and measure the brown, spongy layer between the green grass and the soil surface. If it exceeds three quarters of an inch, it is time to dethatch.
You can dethatch using a dethatching rake for small areas or a power dethatcher for larger lawns. The best time to dethatch is during active growing season so the lawn can recover quickly. Follow up with overseeding and a light application of compost to fill in any thin areas.
Pros of dethatching: Restores water and nutrient flow to roots, improves fertilizer effectiveness, and reduces disease risk.
Cons of dethatching: Temporarily stresses the lawn, requires equipment, and should only be done during peak growing season.
How to Use a Soil Test to Diagnose Yellow Grass
A soil test is the single most useful tool for diagnosing a yellow lawn. It removes the guesswork and tells you exactly what your soil has and what it lacks. Most state cooperative extension offices offer soil testing for a small fee, and results come back within one to two weeks.
The test measures pH, nitrogen, phosphorus, potassium, iron, and other micronutrients. It also measures organic matter content and sometimes soil texture. Each of these factors affects whether your grass can absorb the nutrients it needs.
To collect a sample, use a clean trowel to take soil from several spots across your lawn at a depth of four to six inches. Mix the samples together in a clean bucket, then send the recommended amount to the lab. Avoid sampling right after fertilizing, as this skews the results.
Once you receive the results, follow the lab’s specific recommendations for amendments. Do not guess at fertilizer rates. Applying too much of any nutrient wastes money and can damage your lawn. The test results give you a precise prescription for a healthier yard.
Pros of soil testing: Accurate diagnosis, prevents over application, saves money long term, and gives targeted recommendations.
Cons of soil testing: Takes one to two weeks for results, requires collecting and mailing samples, and costs a small fee (usually under $20).
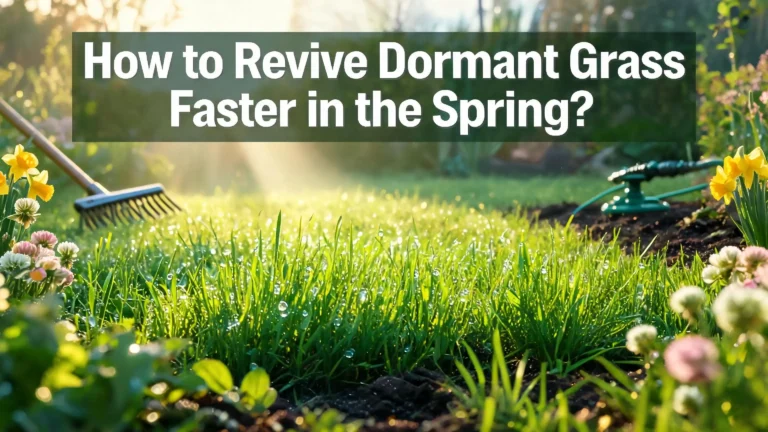
Seasonal Dormancy vs. a Real Problem
Not all yellow grass signals a problem. Many grass species enter dormancy during temperature extremes, and this is a natural survival mechanism. Warm season grasses like Bermuda, Zoysia, and St. Augustine turn yellow or brown during winter. Cool season grasses like bluegrass and ryegrass may yellow during extreme summer heat.
The key difference between dormancy and disease is the pattern and timing. Dormancy affects the entire lawn evenly and coincides with seasonal temperature changes. Disease or nutrient issues produce patchy, irregular yellowing that does not match the weather patterns.
To test for dormancy, water a small section of the yellow lawn consistently for a week. If it begins to green up, the grass is dormant and will recover on its own when conditions improve. If it stays yellow despite watering, something else is going on.
Do not fertilize dormant grass. Pushing growth during dormancy stresses the plant and wastes fertilizer. Instead, wait for the grass to emerge from dormancy naturally and then resume your regular feeding schedule.
Pros of allowing natural dormancy: Zero cost, conserves water, and the grass recovers fully on its own.
Cons of allowing natural dormancy: The lawn looks unattractive for several weeks or months, which bothers some homeowners.
Grub Damage and Insect Infestations
Grubs are the larvae of beetles, and they feed on grass roots below the soil surface. As they eat through the root system, the grass above loses its anchor and nutrient supply. Yellow patches appear and the turf can be pulled up like a loose carpet because the roots are gone.
To check for grubs, cut a one foot square section of turf in a yellow area and peel it back. If you find more than ten grubs per square foot, treatment is needed. A few grubs are normal, but high populations cause visible damage.
Beneficial nematodes and milky spore are organic treatment options that target grubs without harming other organisms. Chemical grub control products containing chlorantraniliprole or trichlorfon are effective for heavy infestations. Apply grub treatments in late summer or early fall when the larvae are small and close to the soil surface.
Other insects like chinch bugs and sod webworms also cause yellowing. Chinch bugs suck sap from grass blades, causing them to yellow and die in expanding patches. Sod webworms chew the blades at the base. Proper identification is critical because each pest requires a different treatment approach.
Pros of organic grub treatments (nematodes, milky spore): Safe for pets and children, targets only grubs, and provides long lasting control.
Cons of organic grub treatments: Slower acting, temperature sensitive, and may require multiple applications.
Pros of chemical grub treatments: Fast and highly effective.
Cons of chemical grub treatments: Can harm beneficial insects, requires careful application, and may need protective equipment during use.
Step by Step Recovery Plan for a Yellow Lawn
If you have identified the cause of your yellow lawn, follow this recovery plan to bring it back to green. Start with the basics and work your way up to more intensive treatments only if needed.
Step 1: Test your soil. Send a sample to your local extension office and get a clear picture of your soil’s pH, nutrient levels, and organic matter content.
Step 2: Adjust your watering. Check soil moisture at a depth of three inches. Water deeply two to three times per week rather than lightly every day. Water in the early morning only.
Step 3: Mow correctly. Raise your mowing height to the recommended range for your grass type. Sharpen your blades. Follow the one third rule every time you mow.
Step 4: Feed based on test results. Apply the nutrients your soil test identified as deficient. Use slow release fertilizer and follow the recommended rates exactly.
Step 5: Aerate if needed. If soil is compacted, schedule core aeration during the active growing season. Top dress with compost after aerating.
Step 6: Treat specific problems. Apply fungicide for confirmed disease, grub control for confirmed infestations, or reseed areas damaged by pets. Address each issue individually rather than applying everything at once.
Most lawns show visible improvement within two to four weeks of correct treatment. Full recovery may take one to two growing seasons for severely damaged lawns.
How to Prevent Your Lawn From Turning Yellow Again
Prevention is easier and cheaper than treatment. Build these habits into your regular lawn care routine to keep yellow grass from returning.
Fertilize on a schedule based on your grass type and soil test results. Most lawns benefit from three to four applications per year. Avoid fertilizing during dormancy or extreme heat.
Water wisely. Install a rain gauge or smart irrigation controller to avoid overwatering. Adjust your schedule seasonally as temperatures and rainfall change.
Mow regularly and at the right height. Keep your blades sharp and never scalp the lawn. Leave grass clippings on the lawn to return nutrients to the soil, a practice called grasscycling.
Aerate annually if you have clay soil or high traffic areas. Combine aeration with overseeding to thicken thin spots and crowd out weeds.
Monitor for pests and disease by walking your lawn weekly. Catching problems early means simpler, less expensive solutions. A ten minute weekly inspection can save you hundreds of dollars in treatments later.
Pros of a consistent prevention routine: Keeps the lawn healthy year round, reduces treatment costs, and catches problems early.
Cons of a consistent prevention routine: Requires regular time investment and some upfront cost for soil tests and equipment.
Frequently Asked Questions
Can yellow grass turn green again?
Yes, in most cases yellow grass can recover and turn green again. If the grass crowns and roots are still alive, proper watering, fertilizing, and care will restore the color. Dormant grass greens up on its own when favorable weather returns. However, if the grass is completely dead with no living roots, you will need to reseed or lay new sod in those areas.
How long does it take for a yellow lawn to recover?
Recovery time depends on the cause. Watering corrections can show results in one to two weeks. Nutrient deficiencies treated with fertilizer typically improve within two to four weeks. Grub damage and reseeded pet spots take three to six weeks. Severe compaction and pH issues may require an entire growing season to fully resolve.
Should I fertilize yellow grass right away?
No, do not fertilize until you know the cause of the yellowing. If the problem is overwatering, disease, or grub damage, adding fertilizer will not help and may make things worse. Always start with a soil test and a proper diagnosis. Fertilize only if the test confirms a nutrient deficiency.
Is yellow grass the same as dead grass?
Not always. Yellow grass is often stressed or dormant, not dead. You can check by pulling on a yellow grass blade. If it resists being pulled and the crown at the base is still firm and white or green, the grass is alive. If it pulls out easily with no root resistance and the crown is brown and mushy, it is dead.
How often should I water my lawn to prevent yellowing?
Most lawns need about one inch of water per week, split into two or three watering sessions. Water deeply each time to encourage roots to grow downward. Avoid daily light watering, which promotes shallow roots and increases disease risk. Adjust your schedule based on rainfall, temperature, and soil type.
When is the best time to fix a yellow lawn?
The best time to address a yellow lawn is during your grass’s active growing season. For cool season grasses, that means early fall or spring. For warm season grasses, late spring through early summer is ideal. Treating during active growth gives the grass the best chance to recover quickly.
Hi, I’m Jane! As a passionate gardener and product enthusiast, I spend my days testing garden tools, comparing products, and writing honest reviews so you don’t have to learn the hard way. Got a question? Feel free to reach out — I’d love to hear from you!